The library was originally hosted in Google Code (service that now read-only and closing in end of Jan 2016) and was migrated to GitHub by J. Mareek.
I worked a little bit in simplifying the integration of the library by migrating everything to Android Studio projects and using Gradle. This work (as of today, Jan 07, 2016) it's on a pending Pull Request to get merged, so in order to use it, I will use my own fork with my updated branch in this guide.
My fork is: https://github.com/rastadrian/android-wheel and the branch we are going to use is: android-studio-gradle-migration.
The goals of this guide are:
- Download the android-wheel project and build the library file (an .aar file).
- Create a project and integrate the android-wheel .aar library.
- Implement the library to create a date-time picker.
- You have Android Studio >=1.4~ installed. (current stable version is 1.5)
- You have git installed. (recommended to always have the current version which is 2.7.0)
Also, here's the repository/project for this demo:
Building the android-wheel library
The library itself is not hosted in maven central or jcenter, so we can't just add the dependency in the build.gradle file. We will need to manually build it and add it as a module in our project.
To do so, first clone the GitHub project and change branches to the android-studio-gradle-migration one.
 git clone https://github.com/rastadrian/android-wheel.git
 cd android-wheel
 git fetch origin
 git checkout android-studio-gradle-migration
Then, move to the library directory (I'll call this directory {android-wheel-library-directory} in later references) and build the project using Gradle.
If it builds successfully, locate the release .aar library, we will need this file to integrate it later on in our project. cd wheel
./gradlew clean build The .aar file should be located in:
{android-wheel-library-directory}/wheel/build/outputs/aar
and it should be called: wheel-release.aar
Integrate library in Android project
I will create a new Android project using Android Studio. The minimum SDK version for the android-wheel library is 7 so is very likely that your project is covered. I would personally recommend setting minimum SDK version of API 10 (Gingerbread 2.3) which covers 100% of users and has significant improvements over lower versions, heck if you can, bump it up as much as possible.

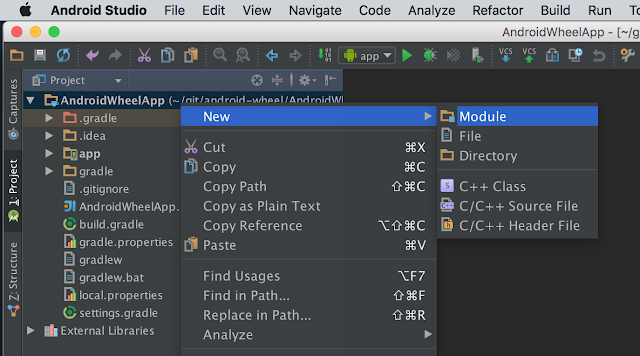
Now that I have the project in place, I need to integrate the .aar library. While in the "Project" view, right click the project and add a new module.

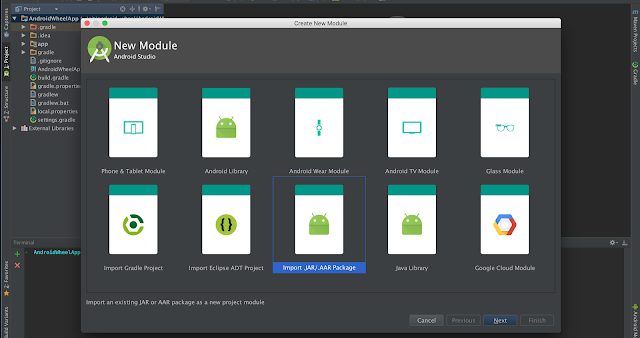
Select the module type to be an "Import .JAR/.AAR Package".

From the next screen, open the finder and locate the wheel-release.aar file.

Change the Subproject name to android-wheel and click Finish.
Now that we have the module in the project, we need to add it as a dependency of our app module. To do so, go to the app module's build.gradle file and add the dependency:
compile project(':android-wheel') 
And now just tap on the Sync Project With Gradle Files icon to update the dependencies and we are all set.
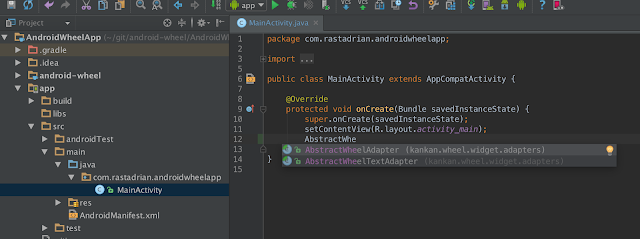
To test that everything went well, I'll try to use one of the library classes (from the kankan.wheel package) and see that AndroidStudio is able to auto complete for me.

Implementing the library
The first thing we have to do is define how many columns we will need for the wheel and write an Adapter for each one. These adapters will help us to fill with data every column.
To make the things easier, the Android-Wheel library provides the following adapters:
NumericWheelAdapter. As its name indicates, this adapter is useful when we just want to fill a column with a sequence of numbers. To use it is necessary to pass in the constructor the first and last number of the sequence.
ArrayWheelAdapter. With this adapter we can fill the column with a defined array and indicate the current value. The array must be String type.
AbstractWheelTextAdapter. This adapter is more flexible than the previous ones. In order to use it, we have to create our own adapter and inherit from this class. I will use this adapter for the example so I will explain it in detail later on.
AbstractWheelAdapter. This is the most flexible of all adapters; we can use it to fill the columns with any kind of object, for example, images.
In this example we are going to make a date picker, so we will need four columns: one for the days, one for the hours, other for the minutes, and one more for the am/pm marker.
For the first column we’ll create one class (which I’ve named “DayWheelAdapter.java”) that inherits from AbstractWheelTextAdapter, but first is necessary define an XML to customize the text of the columns. This XML will work for the four columns.
wheel_item_time.xml
1 2 3 4 5 6 7 8 9 10 | <?xml version="1.0" encoding="utf-8"?> <TextView xmlns:android="http://schemas.android.com/apk/res/android" android:id="@+id/time_item" android:layout_width="wrap_content" android:layout_height="wrap_content" android:textSize="20sp" android:lines="1" android:textStyle="bold" android:textColor="@color/black" android:layout_gravity="end" /> |
Now that we have the XML that will contain the text of the column we can create the DayWheelAdapter class. Let’s see the code below:
DayWheelAdapter.java
1 2 3 4 5 6 7 8 9 10 11 12 13 14 15 16 17 18 19 20 21 22 23 24 25 26 27 28 29 30 31 32 33 34 35 36 37 38 39 40 41 42 43 44 45 | public class DayWheelAdapter extends AbstractWheelTextAdapter { private final List<Date> mDateList; public DayWheelAdapter(Context context, List<Date> dateList) { super(context, R.layout.wheel_item_time); this.mDateList = dateList; } @Override public View getItem(int index, View convertView, ViewGroup parent) { View view = super.getItem(index, convertView, parent); TextView weekday = (TextView) view.findViewById(R.id.time_item); //Format the date (Name of the day / number of the day) SimpleDateFormat dateFormat = new SimpleDateFormat("EEE dd", Locale.getDefault()); //Assign the text weekday.setText(dateFormat.format(mDateList.get(index))); if (index == 0) { //If it is the first date of the array, set the color blue weekday.setText(R.string.today); weekday.setTextColor(Color.BLUE); } else{ //If not set the color to black weekday.setTextColor(Color.BLACK); } return view; } @Override protected CharSequence getItemText(int i) { return ""; } @Override public int getItemsCount() { if(mDateList != null) { return mDateList.size(); } return 0; } } |
For the second and third columns (hours and minutes respectively) we’ll use the NumericWheelAdapter and for the am pm marker column we’ll apply the ArrayWheelAdpter. In the last piece of code we’ll see how to use them, but first, let’s create the XML that actually contains the Android Wheel.
In the dialog_date.xml file I’ve used one "kankan.wheel.widget.WheelView" label for each column; this widget is the one that simulates the fancy wheel.
dialog_date.xml
1 2 3 4 5 6 7 8 9 10 11 12 13 14 15 16 17 18 19 20 21 22 23 24 25 26 27 | <?xml version="1.0" encoding="utf-8"?> <RelativeLayout xmlns:android="http://schemas.android.com/apk/res/android" android:layout_width="match_parent" android:layout_height="match_parent" android:padding="5dp"> <LinearLayout android:id="@+id/wheel" android:layout_height="wrap_content" android:layout_width="wrap_content" android:padding="15dp" android:layout_centerHorizontal="true" android:layout_centerInParent="true"> <kankan.wheel.widget.WheelView android:id="@+id/wv_day" android:layout_height="wrap_content" android:layout_width="100dp"/> <kankan.wheel.widget.WheelView android:id="@+id/wv_hour" android:layout_height="wrap_content" android:layout_width="40dp"/> <kankan.wheel.widget.WheelView android:id="@+id/wv_minute" android:layout_height="wrap_content" android:layout_width="40dp"/> <kankan.wheel.widget.WheelView android:id="@+id/wv_ampm" android:layout_height="wrap_content" android:layout_width="wrap_content"/> </LinearLayout> </RelativeLayout> |
We will include this view in a dialog fragment.
DatePickerDialogFragment.java
1 2 3 4 5 6 7 8 9 10 11 12 13 14 15 16 17 18 19 20 21 22 23 24 25 26 27 28 29 30 31 32 33 34 35 36 37 38 39 40 41 42 43 44 45 46 47 48 49 50 51 52 53 54 55 56 57 58 59 60 61 | public class DatePickerDialogFragment extends DialogFragment { private static final String[] ARRAY_AM_PM = new String[] { "am" , "pm" }; @NonNull @Override public Dialog onCreateDialog(Bundle savedInstanceState) { //inflate first. View dialogView = getActivity().getLayoutInflater().inflate(R.layout.dialog_date, null); //create the dialog second. AlertDialog alertDialog = new AlertDialog.Builder(getActivity()) .setPositiveButton(R.string.button_set, new DialogInterface.OnClickListener() { @Override public void onClick(DialogInterface dialog, int which) { //NOP } }) .setNegativeButton(R.string.button_cancel, new DialogInterface.OnClickListener() { @Override public void onClick(DialogInterface dialog, int which) { //NOP } }) .setView(dialogView) .setTitle(getActivity().getString(R.string.dialog_title)) .create(); setupViews(dialogView); return alertDialog; } private void setupViews(View dialogView) { //With a custom method I get the next following 10 days from now List<Date> days = DateUtils.getNextNumberOfDays(new Date(), 10); //Configure Days Column WheelView day = (WheelView) dialogView.findViewById(R.id.wv_day); day.setViewAdapter(new DayWheelAdapter(getActivity(), days)); //Configure Hours Column WheelView hour = (WheelView) dialogView.findViewById(R.id.wv_hour); NumericWheelAdapter hourAdapter = new NumericWheelAdapter(getActivity(), 1, 12); hourAdapter.setItemResource(R.layout.wheel_item_time); hourAdapter.setItemTextResource(R.id.time_item); hour.setViewAdapter(hourAdapter); //Configure Minutes Column WheelView min = (WheelView) dialogView.findViewById(R.id.wv_minute); NumericWheelAdapter minAdapter = new NumericWheelAdapter(getActivity(), 0, 59); minAdapter.setItemResource(R.layout.wheel_item_time); minAdapter.setItemTextResource(R.id.time_item); min.setViewAdapter(minAdapter); //Configure am/pm Marker Column WheelView ampm = (WheelView) dialogView.findViewById(R.id.wv_ampm); ArrayWheelAdapter<String> ampmAdapter = new ArrayWheelAdapter<>(getActivity(), ARRAY_AM_PM); ampmAdapter.setItemResource(R.layout.wheel_item_time); ampmAdapter.setItemTextResource(R.id.time_item); ampm.setViewAdapter(ampmAdapter); } } |
And the MainActivity will be in charge of showing the dialog.
MainActivity.java
1 2 3 4 5 6 7 8 9 10 11 12 13 14 15 16 | public class MainActivity extends AppCompatActivity { @Override protected void onCreate(Bundle savedInstanceState) { super.onCreate(savedInstanceState); setContentView(R.layout.activity_main); Button showPickerButton = (Button) findViewById(R.id.btn_show_picker); showPickerButton.setOnClickListener(new View.OnClickListener() { @Override public void onClick(View v) { new DatePickerDialogFragment().show(getSupportFragmentManager(), DatePickerDialogFragment.class.getSimpleName()); } }); } } |
On Nelida's original post (somewhere about 4 years ago), she said and I quote:
Over time I realized that (or at least that's what I think) is better to keep the look and feel for every platform and not try to mix them in order to give consistence to the user, but that’s up to you.I personally think that it is correct, and nowadays, with a more concise design guidelines such as Material Design for Android, there are components that may replace this kind of user interfaces, but there is always the exception, there is always that scenario, and for those, here you go, hope this helps!
NOTE: As soon as we get the android-wheel library in mavenCentral or jCenter, I will update this blog to avoid adding the library as a module, and just add it as a dependency in the project's build.gradle file.

Este comentario ha sido eliminado por el autor.
ResponderEliminarThis is great! Thank you so much!
ResponderEliminarthat some awesome post you have there! I was looking into using AndroidWheel but I have a question for you I hope I get an answer to.
ResponderEliminarHow do you record the user's choice? The code that you have given above only creates the views and enables scroll. Or did I miss something?
Cheers
That's a great Tutorial, is it possible to change the color of the selected text?
ResponderEliminarI following your tutorial but got an error so I clone you repo but still got the same error:
ResponderEliminarNoClassDefFoundError: kankan/wheel/widget/R$drawable
What am I doing wrong?
Cheers
Charlie
I used the wheel view to display images. But when I start scrolling the wheel before all images gets loaded then the some images never gets loaded. Please suggest the action.
ResponderEliminar//With a custom method I get the next following 10 days from now
ResponderEliminarList days = DateUtils.getNextNumberOfDays(new Date(), 10);
where is the code?
It’s always so sweet and also full of a lot of fun for me personally and my office colleagues to search your blog a minimum of thrice in a week to see the new guidance you have got.Block Chain Training in Bangalore
ResponderEliminarEste comentario ha sido eliminado por el autor.
ResponderEliminarGood Post! Thank you so much for sharing this pretty post, it was so good to read and useful to improve my knowledge as updated one, keep blogging.
ResponderEliminarrpa training in Chennai
rpa training in anna nagar | rpa training in marathahalli
rpa training in btm | rpa training in kalyan nagar
rpa training in electronic city | rpa training in chennai
rpa online training | selenium training in training
Inspiring writings and I greatly admired what you have to say , I hope you continue to provide new ideas for us all and greetings success always for you..Keep update more information..
ResponderEliminarrpa training in Chennai | best rpa training in chennai
rpa training in pune
rpa online training | rpa training in bangalore
Awesome article. It is so detailed and well formatted that i enjoyed reading it as well as get some new information too.
ResponderEliminarjava course in annanagar | java course in chennai
java course in marathahalli | java course in btm layout
This is quite educational arrange. It has famous breeding about what I rarity to vouch. Colossal proverb. This trumpet is a famous tone to nab to troths. Congratulations on a career well achieved. This arrange is synchronous s informative impolites festivity to pity. I appreciated what you ok extremely here
ResponderEliminarData Science training in Chennai
Data science training in bangalore
Data science training in pune
Data science online training
This is an awesome post.Really very informative and creative contents. These concept is a good way to enhance the knowledge.I like it and help me to development very well.Thank you for this brief explanation and very nice information.Well, got a good knowledge.
ResponderEliminarpython training in velachery
python training institute in chennai
This is my 1st visit to your web... But I'm so impressed with your content. Good Job!
ResponderEliminarangularjs online Training
angularjs Training in marathahalli
angularjs interview questions and answers
angularjs Training in bangalore
angularjs Training in bangalore
Does your blog have a contact page? I’m having problems locating it but, I’d like to shoot you an email. I’ve got some recommendations for your blog you might be interested in hearing.
ResponderEliminarBest Amazon Web Services Training in Pune | Advanced AWS Training in Pune
Advanced AWS Training in Chennai | No.1 Amazon Web Services Training in Chennai
Best Amazon Web Services Training in Chennai |Advancced AWS Training in Chennai
Best Amazon Web Services Online Training | Advanced Online Amazon Web Services Certification Course Training
Best Amazon Web Services Training in Pune | Advanced AWS Training in Pune
Excellent and useful blog about android. Continue sharing more like this.
ResponderEliminarData Science Course in Chennai
Data Science Training in Chennai
AWS Training in Chennai
AWS course in Chennai
Angularjs Training in Chennai
Angularjs course in Chennai
RPA Training in Chennai
Amazing post thanks for sharing
ResponderEliminarSelenium Training Institute in chennai | Selenium Testing Training in Chennai
Very good information. Its very useful for me. We need learn from real time examples and for this we choose good training institute, we need to learn from experts . So we make use of demo classes . Recently we tried azure demo class of Apponix Technologies
ResponderEliminarVisit for Blockchain training in Bangalore :
ResponderEliminarBlockchain training in Bangalore
Visit for Blockchain training in Bangalore:- Blockchain training in Bangalore
ResponderEliminar
ResponderEliminarGreat blog created by you. I read your blog, its best and useful information. Super blogging and keep it updating
Blockchain Training in Hyderabad
keep on share guy.it may help us and other also.thanks a lot ur effort and ur hadwork.
ResponderEliminarAi & Artificial Intelligence Course in Chennai
PHP Training in Chennai
Ethical Hacking Course in Chennai Blue Prism Training in Chennai
UiPath Training in Chennai
Thank you for providing this Blog. every content should be very neatly represented. each and every concept was explained very clearly.The given information very impressed for me really so nice content.
ResponderEliminarData Science Training In Chennai
Data Science Online Training In Chennai
Data Science Training In Bangalore
Data Science Training In Hyderabad
Data Science Training In Coimbatore
Data Science Training
Data Science Online Training
Thank you for the informative post. It was thoroughly helpful to me. Keep posting more such articles and enlighten us.
ResponderEliminarDevOps Training in Hyderabad
The content on your blog was really helpful and informative. Thakyou. # BOOST Your GOOGLE RANKING.It’s Your Time To Be On #1st Page
ResponderEliminarOur Motive is not just to create links but to get them indexed as will
Increase Domain Authority (DA).We’re on a mission to increase DA PA of your domain
High Quality Backlink Building Service
1000 Backlink at cheapest
50 High Quality Backlinks for just 50 INR
2000 Backlink at cheapest
5000 Backlink at cheapest
A good read! Additionally, our specialists have provided in-depth commentary on these trainings & courses! I've provided this for your information. Check out full stack developer course in noida and take pleasure in knowing more.
ResponderEliminar